Explore how sustainable gardening, espalier, regenerative orchard & community farming are ingrained into the UK history and culture
How to Prune Young Fruit Trees

Many people think fruit trees don’t need pruning until they’re older, but the opposite is true. Formative pruning in the first three years shapes a strong, fruit-bearing structure that will last a lifetime. In this article, I’ll explain why early pruning matters and how to prune young fruit trees in their first 3–5 years. Let’s dig in!
Why Do We Prune Fruit Trees?
Why do we prune young fruit trees when they are so small already? Here are a few very important reasons:
- To ensure each branch has equal access to sunlight, so that the fruit can ripen properly.
- To allow good air circulation within the canopy to help prevent common fruit tree diseases.
- To channel the tree's limited energy into fewer, more productive branches for larger, healthier, and sweeter fruit.
- To keep your tree at a manageable size for easier spraying, pruning, and harvesting.
- To train your tree to grow into a strong, sturdy shape that supports a heavy fruit load.
- To remove non-productive vertical branches (water sprouts) and awkwardly angled branches that will crowd and shade the canopy.
Throughout this article, I will explore the basics of pruning young fruit trees, but if you’re ready for a deep dive, my fruit tree care books will be there for you to guide you every step of the way.
But, when is the best time to prune young fruit trees? Let's explore that next.
When Should You Prune Fruit Trees
If you are planting a bare root tree from a specialist fruit tree nursery and you have planted it in the early spring, you can do the first pruning cut, called the whip cut, on planting day! If you are planting it in the fall, not long before the onset of winter, it's best to do your first cut the following year in the late winter or early spring.
You can learn more about the whip cut in the video below.
Three Secrets of Young Fruit Tree Care | Orchard People

If, however, you are planting a potted fruit tree, it's important to let the tree settle into its new location. In that case, allow your young tree to grow for a full season, then prune it the following year.
The time of year for fruit tree pruning is also important. Pruning fruit trees in the winter has a very different effect on the tree than pruning the very same tree in the summer. Let's explore the best time of year for fruit tree pruning next.
Pruning Fruit Trees in Winter Spurs Growth
If you have a young or small, slow-growing fruit tree, prune it in late winter or early spring while the tree is still dormant.
Why? Over winter, fruit trees store energy in their roots, which is released in spring to fuel bud growth, leaves, blossoms, and fruit. With fewer branches, more energy goes to each remaining branch, encouraging stronger, longer growth, and if mature, a better harvest.
So, for young fruit trees, winter pruning is best!
Pruning Fruit Trees in Summer Reduces Tree Size
Summer pruning, however, is better suited to larger fruit trees. So if you want to prune an old, overgrown apple tree, or if you have a large cherry tree and you want to reduce its size, summer pruning is the way to go.
That's because you want those trees to burn up all that energy it stored over the winter in its roots in the early spring. It will use that fuel to open buds, blossom and set fruit on all of its many branches! At that point, the tree won't have much stored energy left so if you prune your fruit tree in the early to mid summer, it won't have the get up and go to grow larger or to grow more branches. Instead, whatever energy it has will be devoted to fruit production.
Learn more in this article about when to prune fruit trees.

The Best Way to Prune a Fruit Tree
There are a number of fruit tree pruning strategies that growers use to grow fruit trees. One of the most popular is the Central Leader pruning strategy where the tree is trained into a Christmas tree shape, with one central trunk or stem and multiple horizontal branches at the sides.
In my community orchard we use this approach on our apple, pear, plum, apricot and cherry trees.
Other growers may opt instead for the Open Center strategy. In this case, the tree is pruned into a cup or goblet shape with just 3 to 5 main branches. That is a traditional way to prune stone fruit trees like peaches, or some types of cherry trees.
In this article, we'll focus on Central Leader pruning. But whichever fruit tree pruning strategy you use, you will need to know how to make a correct pruning cut. If you make your cuts incorrectly, the tree will not be able to heal the wound and it can be an entry point for pests and diseases.
Pruning Cuts for Fruit Trees
There are two main pruning cuts that you will do to sculpt your tree into the ideal fruit bearing structure.

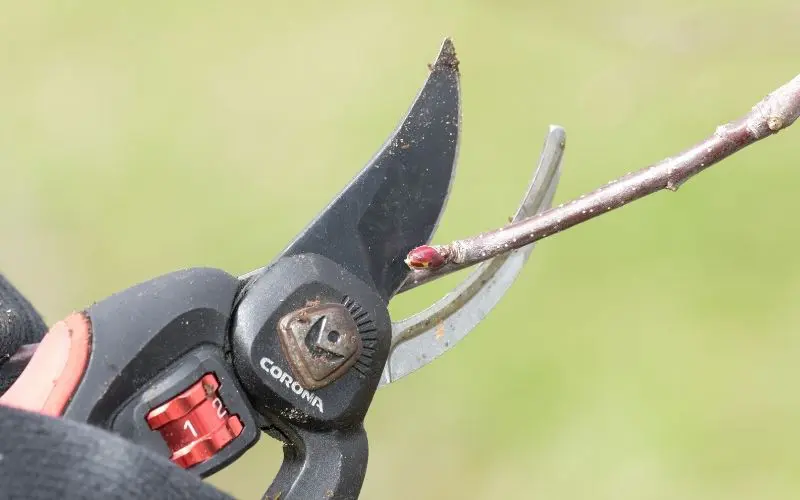
Thinning Out Cuts remove a branch completely. To do this you will cut the branch back to the trunk (or to its point of origin). But it's important to do this correctly. Branches have something called a collar, which looks like a ring or "turtleneck" at the base of the branch. You can see the collar, which looks like a ring at the stem of the branch, in the image below.

When you use your sharp, clean pruners to cut the branch, be sure to leave the collar intact because cells in that collar will help to heal the pruning wound over time. If you remove the collar, the pruning wound will not heal and will serve as an entry point for pests and diseases.
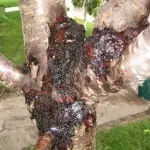
If you leave too much space after the collar before cutting, you will leave a stub as we can see in the photograph above. Stubs aren't helpful. They will die and become an entry point for pests and diseases. So, when doing a thinning out cut, cut just past the collar.
Heading Back Cuts shorten a branch. Here you will cut 1/4 of an inch past a healthy bud on the branch. Choose a bud that looks like it is pointing in a direction away from the trunk to ensure that your branch will continue to stretch out and away from the trunk rather than reaching up, down or inwards towards the tree. Those types of branches can crowd the canopy and create the dark, damp conditions we are trying to avoid.
One thing to remember is that you must always use clean, and sharp tools and sanitize them by dipping the blades in isopropyl alcohol before starting to work on a new tree. That will help you prevent spreading unseen diseases from tree to tree.
It's also best practice to prune young fruit trees (or any fruit tree!) on a dry day. Fungal diseases spread in damp, rainy conditions and a new pruning wound can be very vulnerable in those conditions. If you prune on a dry day, within a few days microscopic cells will form to cover the wound so that it will protected.
How to Prune Young Fruit Trees in Four Steps
Ok, so now we're ready! When it comes to pruning young fruit trees, you will be working with a small tree, so winter pruning is best as it will spur growth.
Here are the four steps for pruning a young fruit tree using the Central Leader Strategy.

STEP ONE: Identify the Central Leader
Stand back and assess the tree’s structure, noting where sunlight hits and where shadows fall. You’ll want even sun exposure for all of the tree's branches. Now, select the strongest vertical branch to be the central leader, even if it’s not the tallest. This branch should be stable, healthy, and positioned to continue the trunk’s growth. Use a thinning out cut to remove any competing vertical branches.

STEP TWO: Choose Your Scaffold Branches
Stand back again to evaluate the side branches, which are called scaffold branches. Starting from the bottom, remove any branches below knee height. Next, select three to five healthy branches radiating outwards (e.g., north, south, east, and west) to keep. These branches should be a few inches apart on the trunk of the tree. This will be your tree's lowest set of branches.
Once you have selected your scaffold branches, remove any side branches that are not part of this grouping, which is called a "platform". If your tree is very young, that means you might be removing all the remaining side branches on your young tree! But that's ok. Our goal is to ensure that the tree's limited energy is diverted directly into our chosen branches and not fuelling growth in scaffold branches that will crowd the canopy.
Finally, head back the Central leader now so that it is 2-3 feet (60-90 cm) above the top branch in the first platform and you're done for this year!
Grow
Fruit Trees
That Thrive
Fruit Trees
That Thrive
Sign up for our newsletter and get this free eBook
Sign up for our newsletter and get this free eBook
In the growing season to come, the tree will get taller and more side branches will appear. So in the following year, you will choose 3-5 branches that appear 2-3 feet above your first platform. Ensure these branches don’t shade out the lower platform. So, if your first platform branches extend N, S, E, and W, the second might extend NW, SW, NE, and SE. Thin out any side branches that are not part of your first and second platform. Finish by cutting back the central leader to 2-3 feet above the top platform to encourage growth next year.
In year three, you will choose side branches to form the third platform. Again you will thin out any scaffold branches that are not part of Platforms One, Two and Three, and you will head back the leader above to form the top of the triangle.
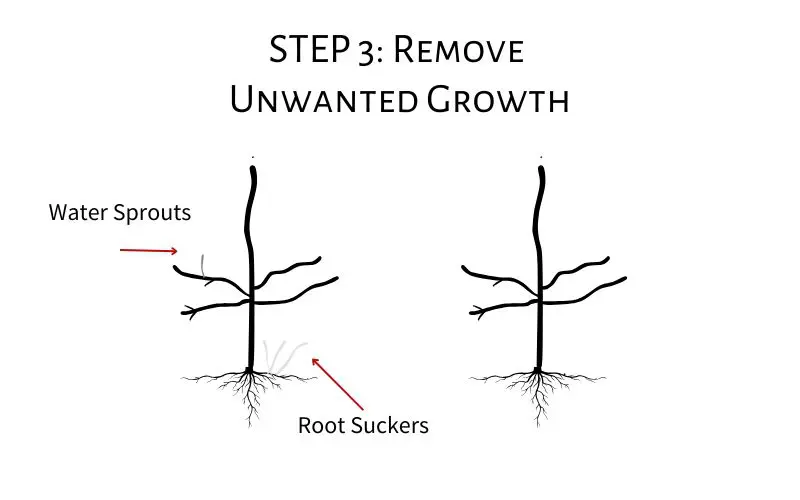
STEP THREE: Remove Unwanted Growth
At this point, you have removed a lot of healthy branches! And you might have removed other branches too. Make sure that your tree is free of any broken, or diseased branches. Prune out suckers, which are shoots growing from the rootstock. And remove water sprouts, which are vertical shoots that often appear on scaffold branches.

STEP FOUR: Create the Triangle Shape
Your final step is to make sure that your young tree is shaped like a triangle or Christmas tree. So head back the side branches as necessary to ensure that the scaffold branches on Platform One are longer than those on platforms two and three.
How much of the fruit tree can you prune off?
When you are pruning a young and newly planted fruit tree, you can prune out up to 40 percent of the top of the tree lot as long as you have planted a bare root tree. But if you are working with a potted tree, or a mature tree, you need to limit your pruning to removing just 20-25 percent of the canopy. That's because older trees will get stressed if you prune out too much and that can affect tree health and cause the formation of unwanted water sprouts.

Pruning Established Trees after Year 3
After the structure is formed, your job will be to maintain the tree's shape. Here is what to do when pruning a young tree after the third year.
- Remove deadwood, diseased or broken branches.
- Remove water sprouts and suckers. Remove any branch that might be competing with your central leader.
- Remove branches that are low to the ground and remove crisscrossed branches, retaining the stronger-looking branch.
- Find replacements for any broken or diseased scaffold branches by removing them and allowing newly grown branches to remain and take their place.
- Shorten scaffold branches as necessary in order to keep the conical or Christmas tree shape (with shorter scaffold branches near the top of the tree and longer ones near the bottom).
- Remove any leafed-out lateral branches that may be blocking sunlight in large parts of your tree.
Pruning young fruit trees is one of the most important things that you can do to help them become strong, healthy and productive in maturity. By following these steps, you’re setting your tree up for success, but there’s always more to learn!
If you’re ready to become a pruning pro, my fruit tree pruning books dig deeper into these techniques, exploring the science, timing, and strategies for every stage of growth. Check them out and take your fruit tree care skills to the next level!

Susan Poizner
Award-winning author, podcaster, fruit tree care educator and creator of the fruit tree care education website OrchardPeople.com. Learn more about Susan on the about us page.
YOU MAY ALSO BE INTERESTED IN

Fruit Tree Garden Tour: Exploring Sustainable Gardening, Espalier, Regenerative Orchard & Community Farming
A tell-tale sign of tree stress: Causes of gummosis on your cherry tree
If you see sticky goop oozing out of your cherry tree, it is gummosis. What are the causes of gummosis? Read more
Fruit Tree Pruning Courses for Arborists (and Others!)
What's the difference between an arborist and a fruit tree grower? How can arborists learn fruit tree care skills?

When to prune fruit trees
Wondering when to prune fruit trees? In this blog, we explore which trees benefit most from winter pruning and when Read more